This article will take you through the Save and Export Menu and show both processes. In this Menu, you can Save and Export your files, set your Saving Settings, and access the Screenshot feature to take screenshots.
Access
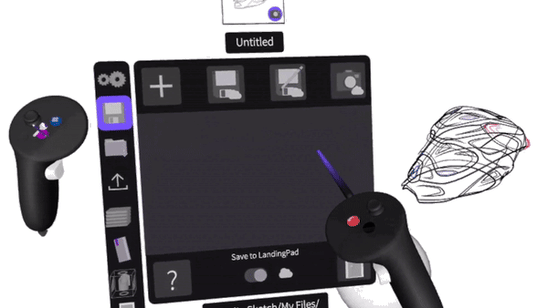
To get to the Save & Export Menu:
1. Click the blue Menu button on your non-drawing hand
2. Select Save & Export (floppy disk icon)

A. Sketch Thumbnail: Select the camera icon to create a custom thumbnail. Once the camera opens select the blue button to capture a new image that will be set as a new thumbnail
B. New Sketch: Start a new sketch
C. Save Draft : Save a draft
D. Save As: Save a new version of a current sketch
E. Take Screenshot: Take screenshots or instant photos within the sketch
F. Report an Issue: Click to report an issue you are experiencing in Gravity Sketch VR (also available in Quick Access buttons)
G. Save Settings: Toggle between saving locally or saving on cloud
H. Exit to Lobby: Selecting the door icon will take you back to the Lobby (also available in Quick Access buttons)
Saving Settings
In Gravity Sketch VR you can Save and Export your sketches and screenshots to the Cloud or Locally to your Device/PC.
Use the slider on the bottom of the interface to choose where to save your files and screenshots.
According to your Saving Settings, you will be able to access your files on your PC (if Saving on Local) or in your LandingPad account on landingpad.me (if saving on Cloud).
Note: When saving and exporting your files to Cloud you can specify the location you would like your file to be saved/exported to. This is currently not possible when saving/exporting your files Locally.
Save / Save As
When Saving your sketches in Gravity Sketch there are two options available: Save Sketch and Save As.
The Save Sketch button will save your sketch incrementally.
1) When you are working in a Gravity Sketch file, save the sketch for the first time and you will be able to specify the saving location. Every next saving with the Save Sketch button will override the data of the existing file version.
2) When you are working in a collab room, your sketch should be automatically saved, incrementally.
The Save As button allows you to create a new version of a file or to create an entirely new file.
To do that: Select the Save As button, specify the saving location, select the name and click the blue check mark.
Sketches will be saved as GRS files.
Export
You can export your sketch in a different file format (OBJ, FBX and IGES) for other uses directly from Gravity Sketch VR. Choose file type and settings then press the blue check mark.
Learn more about all three file formats and advanced settings HERE.
When exporting to the FBX format on standalone Oculus Quest or Quest 2, you will need to export to Cloud.
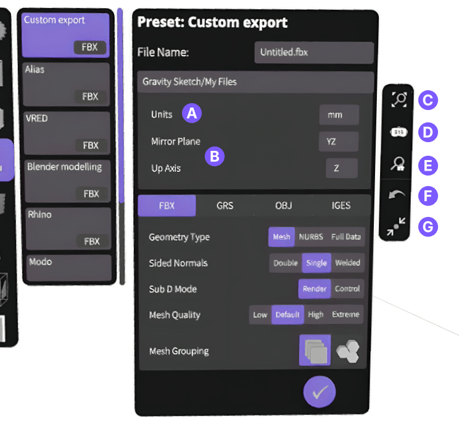
A. Model Unit: Select the default unit scale. Gravity Sketch geometries are created in meters as default
B. Up Axis & Mirror plane: Set vertical axis and side-view plane for other software. The file created in Gravity Sketch uses the Y-axis as the default
C. Locate Preview: Preview the model's position and orientation before export
D. Zoom to 1:1 Scale: Displays the model at its actual size
E. Home Orientation: Resets the camera to the default view for a standard perspective
F. Reset Transform: Restores the model to its original state, removing any applied transformations
G. Re-centre: Click to re-centre your model to the origin