Screenshots
Introduction
You might want to have images of your model for various purposes (for future reference, to share images of your model on social media platforms etc.). In Gravity Sketch you can do that with the Screenshot feature.
Screenshot Panel
To get to the Screenshot feature:
1. Click the blue Menu button
2. Go to Save & Export
3. Click Take Screenshot (camera icon) or pull the trigger on your non-drawing hand controller to take the screenshot.

You can also access the Screenshot feature in the Quick Access Menu on your non-drawing hand wrist. Turn the controller outwards and select Take Screenshot (camera icon button).

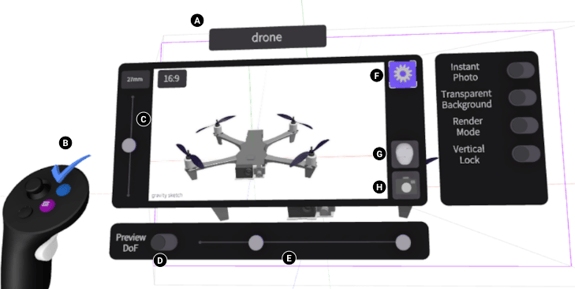
A. Screenshot Name: Select to change the name and/or location of the screenshot
B. Close: Exit camera mode
C. Field of View: Adjust the focal length of the camera
D. Depth of Field (on tethered headsets only): Adjust knobs to put a certain part of your sketch in focus. Only the objects in between the Far (indicated with purple) and Near (indicated with orange) planes will be focused
E. Preview of DoF (on tethered headsets only): Activate to visualize the Depth of Field effect on the camera screen
F. Advanced Settings: Select to open/close Screenshot Settings:
- Instant Photo: Take a screenshot to keep it in the scene (as an editable NURBS quad surface)
- Transparent Background: This allows you to take a screenshot with no background
- Render Mode: Toggle between Screenshot and Render. Screenshot captures the scene exactly as you see it, while Render will hide menu and interface elements from the screenshot and apply ambient occlusion if it's not already enabled.
- Vertical Lock: Lock the screenshot panel to the right angle (90 degrees)
G. Make Viewpoint: Select to create a viewpoint
H. Take Screenshot: Select to take a screenshot
Your Screenshots will be saved as PNG files.
Access screenshots
Your screenshots will be saved either 1. locally on your headset or 2. on Cloud, depending on your Saving settings.
If your Saving settings are set to Save to Local, you will be able to access them on your PC. While your headset is connected to your PC go to Internal shared storage\Gravity Sketch\Screenshots.
You will not be able to select the location when saving locally.
If you are saving to Cloud, your screenshots will be saved to LandingPad. To access them, go to landingpad.me and log into your account.
Screenshots will be saved to the same location as the original sketch by default. If the sketch hasn't been saved before the screenshots are taken they will automatically save to My Files.
To find the screenshots you are searching for easier, you can apply a screenshot filter in the browser (see screenshot below). First, select the All filer button at the right side of the screen then select the Screenshots filter.

Change the save location
You can change the location and the name of each screenshot by selecting the file name on the screenshot panel and choosing the new location, then typing in the name.
You can change the location only when saving to Cloud (LandingPad).

