---
title: Projected drawing and callout tools for screen (beta)
description: These new tools make it easier to review 3D models, communicate design intent, and provide clear, actionable feedback. Use the Pen, Pencil, and Anchor Point tools to draw precise or freeform marks directly onto the surface of an object. Add Callouts with auto-numbering and text notes to highlight specific areas and communicate feedback.
---
[Skip to content](https://help.gravitysketch.com/projected-drawing-and-callout-tools#main-content)

Open main navigation
Close main navigation
How can we help you?
- There are no suggestions because the search field is empty.
1. [Gravity Sketch](https://help.gravitysketch.com/?hsLang=en)
2. [Gravity Sketch for businesses](https://help.gravitysketch.com/gravity-sketch-for-businesses?hsLang=en)
# Projected drawing and callout tools for screen (beta)
## These new tools make it easier to review 3D models, communicate design intent, and provide clear, actionable feedback.
Use the [**Pen**](https://help.gravitysketch.com/projected-drawing-and-callout-tools#pen-tool), [**Pencil**](https://help.gravitysketch.com/projected-drawing-and-callout-tools#pencil-tool), and [**Anchor Point**](https://help.gravitysketch.com/projected-drawing-and-callout-tools#anchor-point) tools to draw precise or freeform marks directly onto the surface of an object. Add **[Callouts](https://help.gravitysketch.com/projected-drawing-and-callout-tools#callouts-tool)** with auto-numbering and text notes to highlight specific areas and communicate feedback.
Because annotations are attached to the 3D object, you can communicate changes and feedbackin context, without relying on static screenshots or separate markup tools.
These tools are currently in Beta and can be made available to organisations on request through your Customer Success Manager or Support.
---
### Pen tool
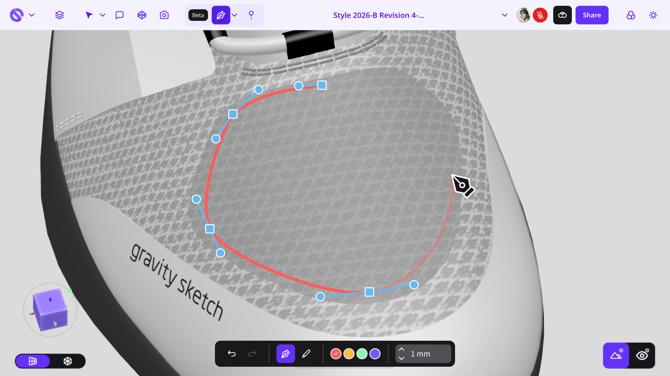
The **Pen** tool lets you manually draw precise strokes and shapes with straight or curved edges, which you create and edit using control points and handles.
The strokes you draw will be projected onto the surface of an object through the control points you have placed.
When you edit the control points or handles, the stroke will be reprojected so it continues to wrap over the surface of the object.
#### **Drawing with the pen tool **
1. To activate the tool, click the **Pen** button or press **P** on the keyboard
2. Use the toolbar at the bottom to adjust the stroke weight in mm and its color
3. Click anywhere on the surface of an object to place a control point:
1. To create an **angled point**, click and release
2. To create a **curved point**, click and drag to create direction handles which set the slope of the stroke segment
4. Continue drawing the stroke by adding new control points.
You can hold the **spacebar** to temporarily orbit, or **spacebar + shift** to pan
5. To finish drawing a stroke:
1. **To create an open stroke**: press **return** or **escape** on your keyboard, or activate another tool
2. **To create a closed path**: hover and click on the initial open control point. The cursor will show a **“○”** icon to indicate the path will be closed
The pen tool cursor will change from unfilled  to filled  when you are hovering over a surface that you can draw onto. To start drawing you must be hovering over an object.
To edit the weight or color of an existing stroke, click to select it and use the inline panel.
#### **Editing with the pen tool**
The pen tool can also be used to add and remove anchor points on an existing stroke.
1. Select an existing stroke for editing: either click on it with the **Direct selection** tool or right click and choose **“Edit”** from the menu.
2. Activate the **Pen** tool.
3. To add a new point, hover over an existing stroke segment and click.
The cursor will show a **“+”** symbol to indicate a point will be added 
4. To remove a point, hover over an existing point and click.
The cursor will show a **“-”** symbol to indicate the point will be removed 
To continue drawing an existing open stroke, click on either of the open control points at the end of the stroke with the pen tool . The cursor will show a **“/”** symbol to indicate that the stroke will be continued 
**Good to know**
- Strokes created with either the **Pen** or **Pencil** tool in the Screen app will be visible in the VR app but this type of stroke cannot be created in VR directly
- Strokes created can be edited in the VR app but will not maintain their projection over the surface of the object when edited from VR
- Whenever a stroke is edited on Screen (regardless of how it was edited previously) it will attempt to reproject over the surface of the object it is attached to
---
### **Pencil tool **
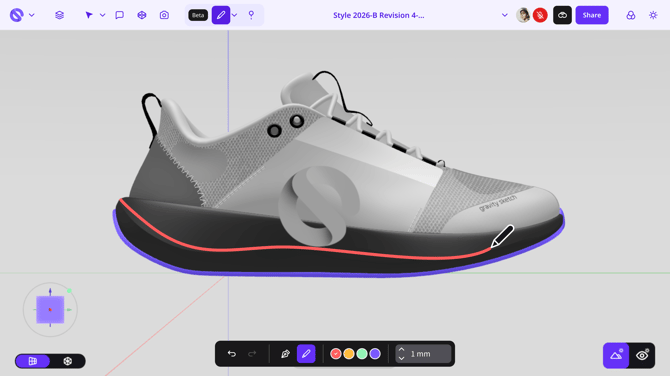
The **Pencil** tool lets you manually draw freeform, continuous strokes. After these strokes are drawn they can be edited using control points and handles.
The strokes you draw will be projected onto the surface of an object to match the path of the pencil tool as you draw.
When you edit the control points or handles, the stroke will be reprojected so it continues to wrap over the surface of the object.
#### **Drawing with the pencil tool **
1. To activate the tool, click the **Pencil** button or press **N** on the keyboard
2. Use the toolbar at the bottom to adjust the stroke weight in mm and its color
3. Click anywhere on the surface of an object and drag to draw a freeform stroke
4. Release the click to finish drawing a stroke
The pencil tool cursor will change from unfilledto filledwhen you are hovering over a surface that you can draw onto. To start drawing you must be hovering over an object.
To edit the weight or color of an existing stroke, click to select it and use the inline panel.
---
### **Anchor Point tool 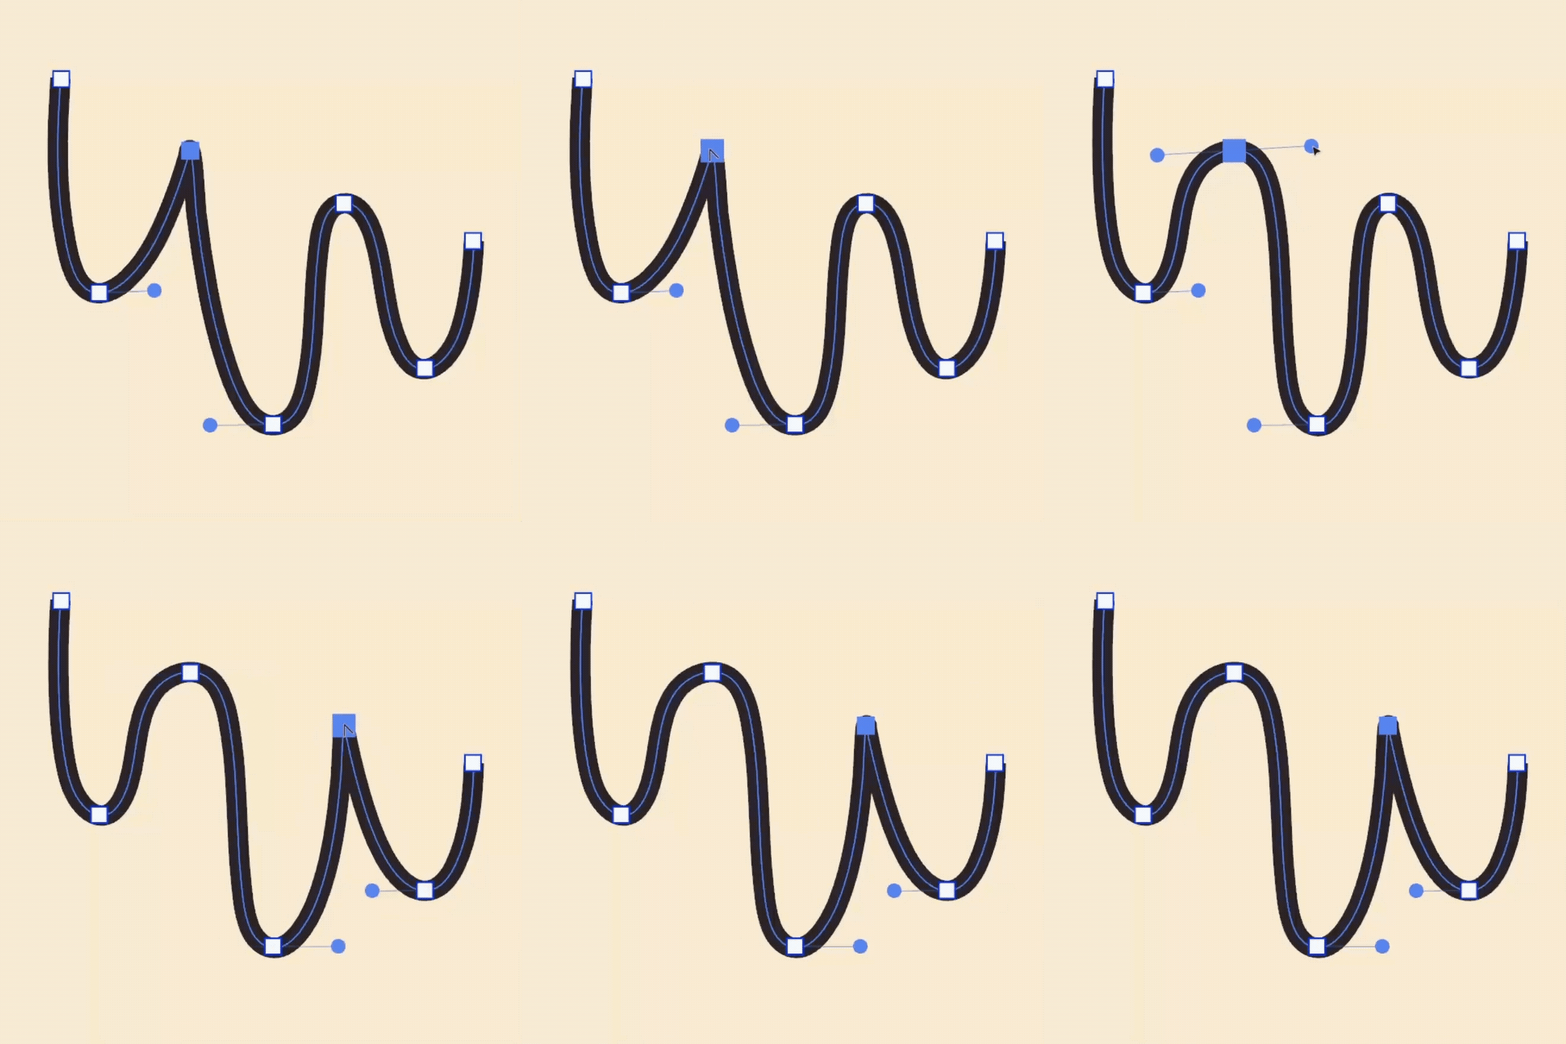**
The **Anchor Point** tool lets you adjust the direction and curve of strokes.
#### **Using the Anchor Point tool** 
1. Select an existing stroke for editing: either click on it with the **Direct selection** tool or right click and choose **“Edit”** from the menu
2. You can activate the tool in 2 ways
3. **To activate directly:** select **Anchor Point** from the toolbar or press **Shift+C** on your keyboard
4. **To activate temporarily while using the Pen tool:** while the **Pen** tool is active, press and hold **“Alt” / “Option”** on your keyboard
5. While the tool is active, click on a control point on the stroke to adjust it:
6. Click and release on a **curved** control point to convert it to **angled**
7. Click and drag on **any** control point to convert it to **smooth** and set symmetrical direction handles
8. **To adjust the slope of a stroke segment**, click and drag on a direction handle. If handles are symmetrical this will break the symmetry, which can be restored by converting the point to angled then back to curved (see step 3)
9. **To remove a handle**, click and drag it into its control point then release
---
### **Callouts tool 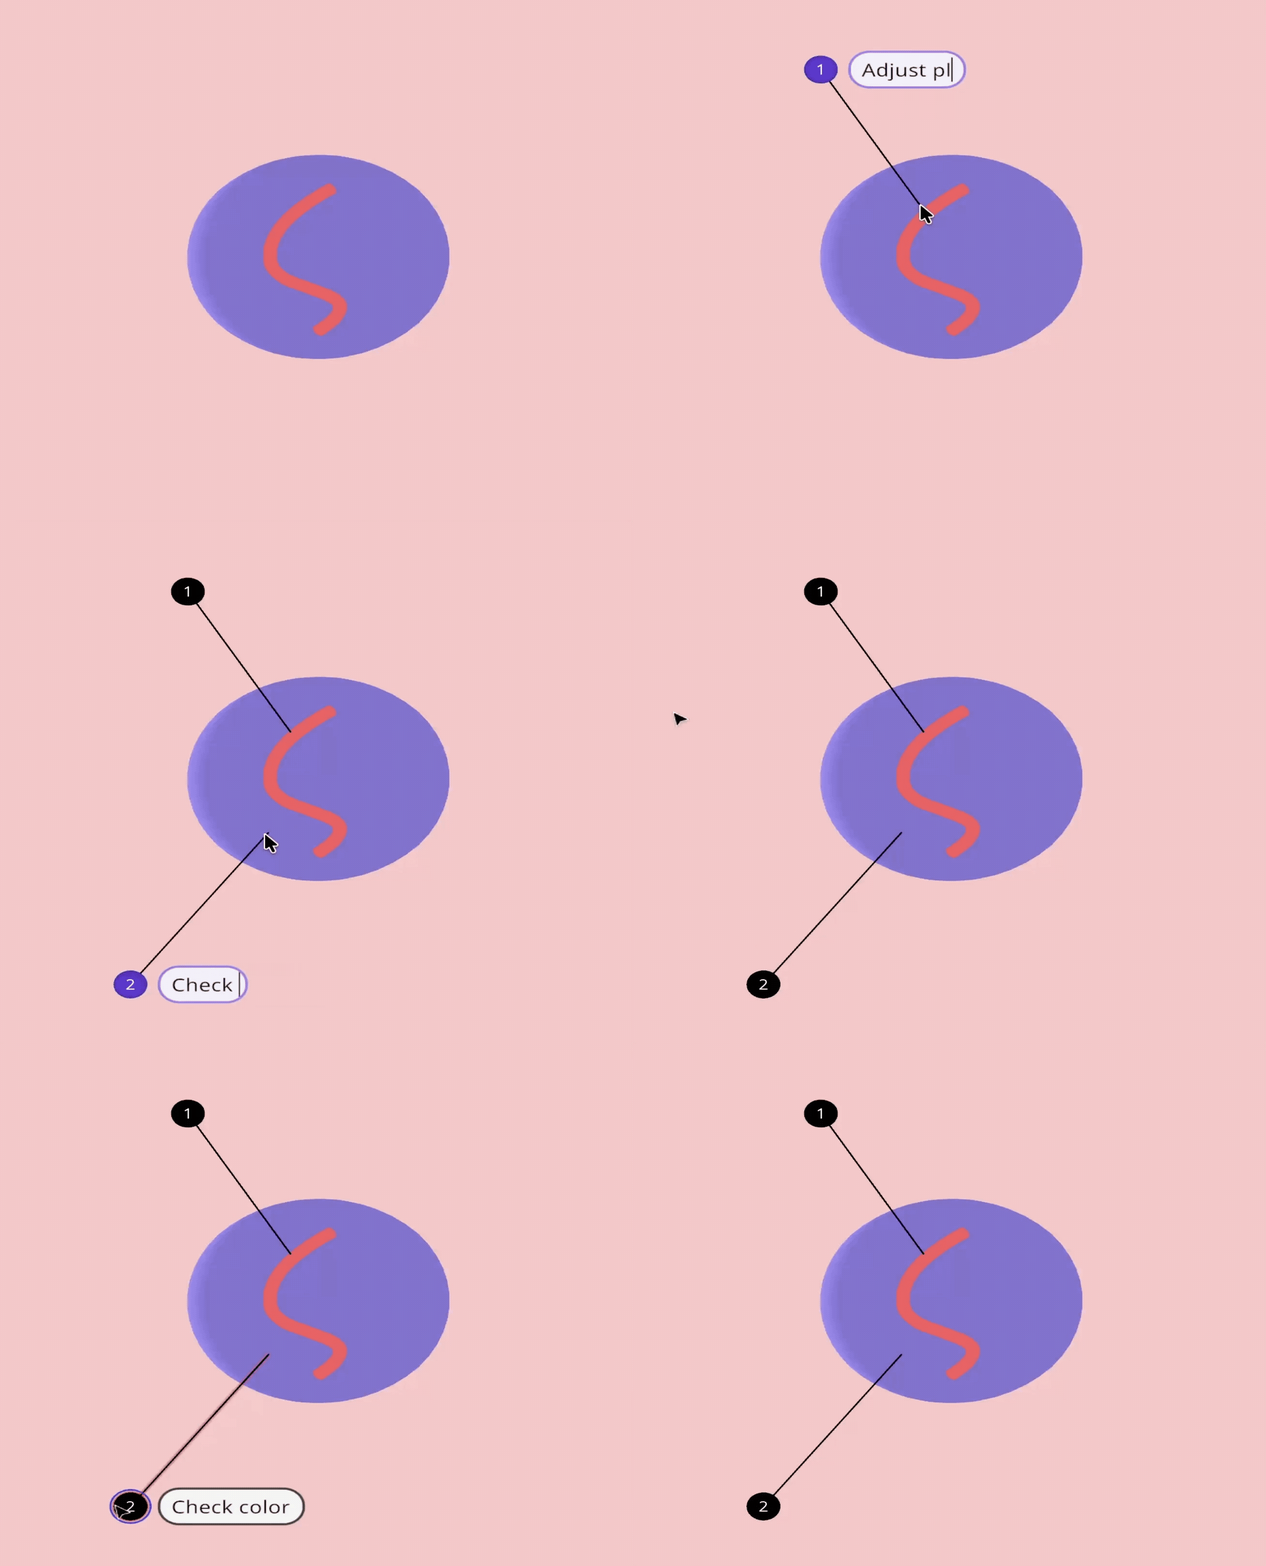**
The **Callouts** tool lets you place objects with a reference number and leader line which points to something specific and can contain a text note.
Callout objects and text will always face the camera and stay a fixed size so they are always clearly visible.
For ease of reference, callouts also appear in an ordered list in a panel which is visible whenever the callouts tool is active.
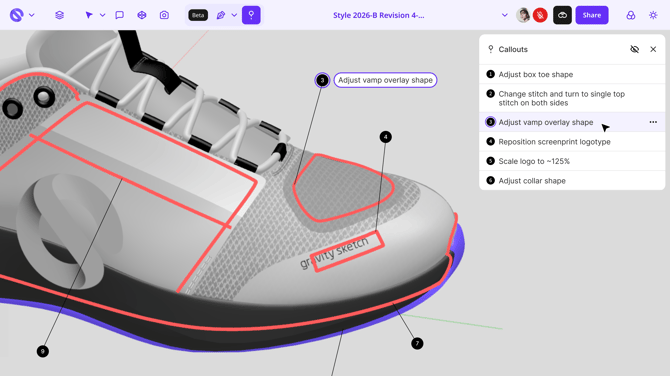
#### **Adding a Callout **
1. To activate the tool, click the **Callouts** button or press **Alt + C** (or **Option + C**) on the keyboard
2. Hover over the surface of an object to see a preview of where the callout object will be placed. The position of the callout can be manually adjusted later
3. Click on the surface of the object to place a callout
4. Optionally type text into the text box and press **return** to save
5. The saved callout will appear in the panel and its text will appear whenever the callout is hovered over or selected
#### **Editing callouts**
- Callouts can be edited in the same way as other objects, either click on a callout with the **Direct selection** tool or right click and choose **“Edit”** from the menu
- Actions when editing a callout:
- **To reposition the leader line:** click and drag on the control point on the end of the line. The line will remain snapped to the surface of the object
- **To reposition the callout bubble:** hover over the numbered bubble to show the control point. Click and drag on the point to adjust the position
- **To edit the callout text**: click on the text box to enter edit mode. Adjust the text and either press **return** on your keyboard or click outside the callout to deselect it
- To delete a callout, either:
- Select the callout and press **backspace** or **delete** on your keyboard
- Hover over the row of the callout in the panel, then click **“...”** and **“Delete”**
#### **Managing callouts**
- Callouts can be organised with layers and layer groups like any other object, and will be shown or hidden according to the state of their parent layer or group
- Callouts are shown in an ordered list in the **“Callouts”** panel, which appears at the right-hand side of the screen whenever the tool is active
- Hover or click on a callout row in the panel to highlight or select the related callout object in the scene and show its full text
- Use the **“...”** menu and **“Delete”** button when hovered over a row to delete a callout from the panel
- Callouts which are not currently visible because they are on a hidden layer will appear in the panel in a disabled state with a hidden icon and a tooltip
- To hide all callouts at once:
- Click the **“Hide callouts”** button  at the top-right of the panel or press **Alt + Shift + C** (or **Option + Shift + C**) on your keyboard
- You can use the keyboard shortcut at any time to hide all callouts, even while the tool is inactive
- To show all callouts again, simply reactivate the **Callouts** tool
#### **Good to know**
- Callouts are only visible in the Screen app (Browser or Desktop) and are not visible in the VR app
- Callouts are not included in exports from either Screen or VR apps
- Callout numbering is automatic and callouts cannot be manually reordered. When a callout is deleted, the following callouts will be renumbered
---
### **Beta feedback**
These tools are in a “Beta” state as they are still being refined and improved.
While any of these tools are active, a **“Give feedback”** button will be available at the bottom-right of your screen.
If you find something missing or unexpected, please use the button to let us know.
- [Getting started](https://help.gravitysketch.com/getting-started?hsLang=en#main-content)
- [Basic VR Controls](https://help.gravitysketch.com/getting-started?hsLang=en#basic-vr-controls)
- [Starter Resources](https://help.gravitysketch.com/getting-started?hsLang=en#starter-resources)
- [VR Guide](https://help.gravitysketch.com/getting-started?hsLang=en#vr-guide)
- [PC & VR Setup](https://help.gravitysketch.com/getting-started?hsLang=en#pc-vr-setup)
- [Troubleshooting](https://help.gravitysketch.com/troubleshooting?hsLang=en#main-content)
- [Troubleshooting](https://help.gravitysketch.com/troubleshooting?hsLang=en#troubleshooting)
- [FAQs](https://help.gravitysketch.com/troubleshooting?hsLang=en#faqs)
- [What's new?](https://help.gravitysketch.com/whats-new?hsLang=en#main-content)
- [Release Notes](https://help.gravitysketch.com/whats-new?hsLang=en#release-notes)
- [Product Updates & Releases](https://help.gravitysketch.com/whats-new?hsLang=en#product-updates-releases)
- [Creation tools](https://help.gravitysketch.com/creation-tools?hsLang=en#main-content)
- [Explore Workspace](https://help.gravitysketch.com/creation-tools?hsLang=en#explore-workspace)
- [Interact with Objects](https://help.gravitysketch.com/creation-tools?hsLang=en#interact-with-objects)
- [Sketching and Basic Editing](https://help.gravitysketch.com/creation-tools?hsLang=en#sketching-and-basic-editing)
- [Advanced Control](https://help.gravitysketch.com/creation-tools?hsLang=en#advanced-control)
- [SubD Editing](https://help.gravitysketch.com/creation-tools?hsLang=en#subd-editing)
- [File Management](https://help.gravitysketch.com/creation-tools?hsLang=en#file-management)
- [Beta Menu](https://help.gravitysketch.com/creation-tools?hsLang=en#beta-menu)
- [Quick Tips](https://help.gravitysketch.com/creation-tools?hsLang=en#quick-tips)
- [Import & export](https://help.gravitysketch.com/import-export?hsLang=en)
- [Collaboration](https://help.gravitysketch.com/collaboration?hsLang=en#main-content)
- [Collaboration in AR/VR](https://help.gravitysketch.com/collaboration?hsLang=en#collaboration-in-ar-vr)
- [Collaboration on Desktop](https://help.gravitysketch.com/collaboration?hsLang=en#collaboration-on-desktop)
- [Presentation](https://help.gravitysketch.com/collaboration?hsLang=en#presentation)
- [Data & security](https://help.gravitysketch.com/data-security?hsLang=en)
- [Gravity Sketch for businesses](https://help.gravitysketch.com/gravity-sketch-for-businesses?hsLang=en#main-content)
- [Organizations in Gravity Sketch](https://help.gravitysketch.com/gravity-sketch-for-businesses?hsLang=en#organizations-in-gravity-sketch)
- [Enterprise Features](https://help.gravitysketch.com/gravity-sketch-for-businesses?hsLang=en#enterprise-features)
- [Learn Gravity Sketch](https://help.gravitysketch.com/learn-gravity-sketch?hsLang=en#main-content)
- [Certification](https://help.gravitysketch.com/learn-gravity-sketch?hsLang=en#certification)
- [Community](https://help.gravitysketch.com/learn-gravity-sketch?hsLang=en#community)
- [Education](https://help.gravitysketch.com/learn-gravity-sketch?hsLang=en#education)
- [Labs](https://help.gravitysketch.com/labs?hsLang=en#main-content)
- [About Labs](https://help.gravitysketch.com/labs?hsLang=en#about-labs)
[](http://gravitysketch.com)
Copyright © 2026, Gravity Sketch